
OBD2 Categories
Recent Articles
-
Difference Between Autel Maxisys Ultra & Autel MaxiCom Ultra Lite S December 27, 2024
-
Autel Maxisys Elite II Pro VS MS909 VS MS919 VS MS Ultra VS Ultra Lite S December 12, 2024
-
Autel Maxisys MS906 PRO VS MS908S PRO II VS MK908 II VS Elite II Pro December 10, 2024

New Releases
Everything you need to know about OBDII Codes
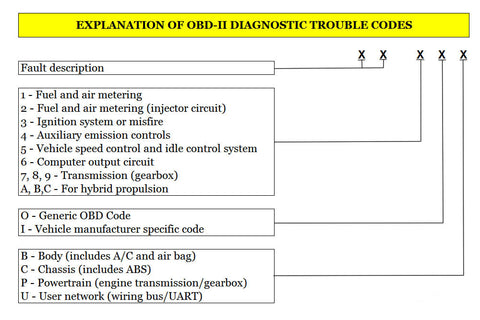
Step 1: Break down your code into sections.
1.The first section is the first character, which is always a letter.
2.The second section is the next character, which is a single number, from 0 to 3.
3.The third section is the third character, which is a single number from 0 to 9.
4. The fourth and last section includes both the fourth and fifth characters together, so it is a pair of numbers, from 00 to 99.
Step 2: Determine the meaning of the letter. There are four possible letters that can be displayed in the first section.
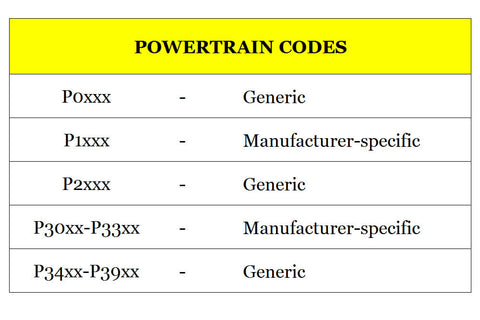
The letter “P” indicates powertrain-related codes such as those involving the engine or the transmission and their sensors. Typically, “P” codes are the only ones that will illuminate the Check Engine Light.
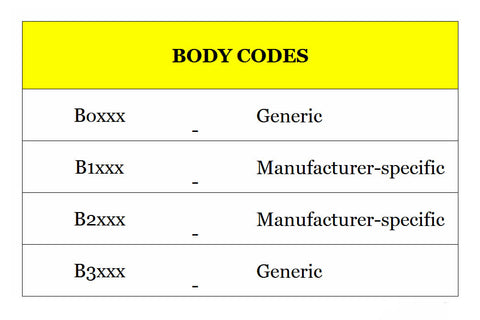
The letter “B” indicates a body code, which means that it relates to a body system such as the airbags.
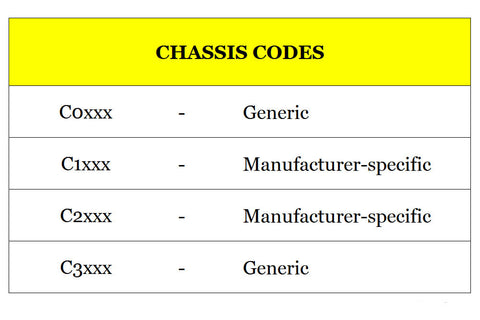
The letter “C” indicates a chassis code, used for systems such as the anti-lock brakes.
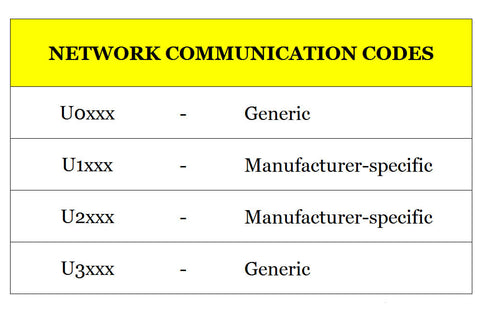
The letter “U” indicates network codes which are used for problems like module failures and losses of communication.
Note: Only professional-grade or dealership scan tools are able to diagnose codes outside of powertrain codes.
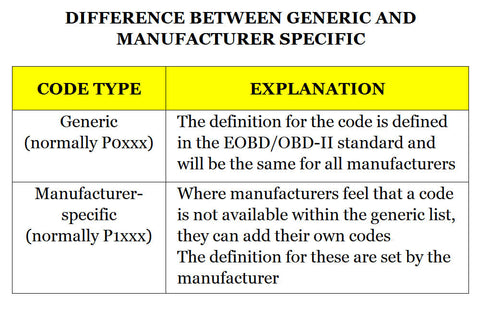
Step 3: Determine if the codes are Society of Automotive Engineers (SAE) codes or manufacturer-specific. This is indicated by the first number in the sequence, immediately after the letter.
SAE codes are generic codes that apply to all makes and models. SAE codes are indicated with a “0” as the second digit.
Manufacturer-specific codes use a number other than “0” as the second digit.
In general, codes that begin with P0 are generic codes concerning a powertrain issue, whereas codes that begin with P1 are manufacturer-specific.
Step 4: Determine which system the code applies to. The third number in the sequence refers to the system that is affected:
A “1” indicates a fuel or air metering system problem, such as an issue with the mass air flow sensor.
A “2” refers to fuel or air metering injection system issues, such as a fuel injector problem.
A “3” indicates an ignition-related problem, such as an engine misfire.
A “4”refers to emissions system problems, like a catalytic converter efficiency issue.
A “5” indicates vehicle speed controls and idle control system problems.
A “6” refers to computer output circuit issues, like an internal computer failure.
The numbers “7”, “8”, or “9” all indicate transmission-related problems, like pressure faults and sensor failures.
Step 5: Determine the exact fault. The last two numbers provide a description of the fault code. To read the description for your specific trouble code, check an online source such as OBD-Code’s website.
Tip: You will want to address the top DTCs first if there are multiple codes. In some cases, the codes lower down on the list may be symptoms of a code higher up on the list.
Note: It is important to remember that any code revealed is only a starting point for proper diagnosis. An OBD code will only indicate the system experiencing the issue; it will not tell you why or how to fix it. Oftentimes, parts are replaced over and over until it is made clear that a code does not equal the part. Codes can also be generated due to temporary problems, such as a loose fuel cap, a poor connection, or even moisture affecting one of the many sensors’ readings. While determining a code may just be the starting point, it is fundamental, and taking these first steps will help you to learn more about your vehicle and let it be your guide.
Recommended Reading:
1.Code Readers VS Scan Tools,Which is more suitable for you?


